15 min to read
Self-Hosting n8n on Raspberry Pi: HTTPS, DDNS & Automated Backups
A production-ready home automation server with Docker, PostgreSQL, SSL and cloud backups
1. Why I Choose to Self-Host n8n on a Raspberry Pi
When I first started working with automation tools, n8n’s cloud offering seemed like the best choice. But after a few months, I found myself increasingly concerned about where the data lives, especially when handling customer information and internal business logic. The costs were also scaling faster than I’d anticipated, and I kept running into those limitations that come with any SaaS platform: can’t customize the infrastructure, can’t control update timing, can’t peek under the hood when something goes sideways.
As a backend engineer with curiosity and passion for challenges, the idea of self-hosting n8n on a Raspberry Pi started making more sense. I wanted complete control over my automation stack without the recurring charges or vendor dependencies. More importantly, I wanted to understand every layer of the system, from the basic setup to the reverse proxy to the backup strategy. This wasn’t just about getting n8n running locally on a publicly exposed port and calling it done. I needed a setup that could handle production workloads, stay accessible 24/7 from anywhere, and recover gracefully from failures.
What I ended up building is what I’m sharing with you here: a fully Dockerized n8n stack with PostgreSQL, secure HTTPS endpoints, dynamic DNS to handle my home ISP’s changing IP addresses, and automated cloud backups. It’s been running reliably for some weeks now, handling everything from complex workflows to internal notification systems.
2. Stack Architecture and Core Configuration
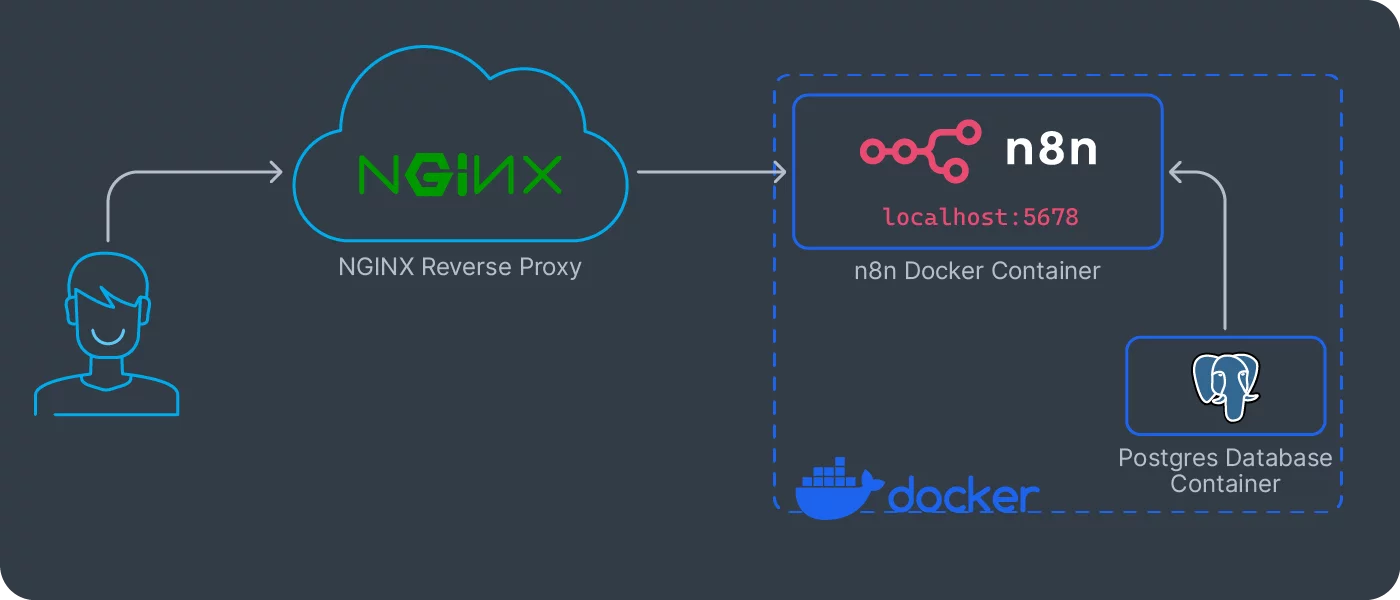
This setup uses Docker Compose to isolate each component, n8n for workflow automation, PostgreSQL as the database, pgAdmin for the PostgreSQL management, and Nginx Proxy Manager for TLS, reverse proxy, and Let’s Encrypt certificate management. Finally, the persistent volumes for each service are stored under ./data.
All sensitive values are stored in a single .env file in the project directory:
POSTGRES_USER=n8nprod
POSTGRES_PASSWORD=supersecretpassword
POSTGRES_DB=n8n
PGADMIN_EMAIL=admin@example.com
PGADMIN_PASSWORD=change_me
N8N_BASIC_AUTH_ACTIVE=true
N8N_BASIC_AUTH_USER=automation
N8N_BASIC_AUTH_PASSWORD=change_me_later
N8N_ENCRYPTION_KEY=<32 char random string>
PUBLIC_DOMAIN=<YOUR_DOMAIN>
N8N_PROTOCOL=https
N8N_PORT=5678
Important: in .env, PUBLIC_DOMAIN=<YOUR_DOMAIN> must be the public domain you want to publish your n8n server, for example n8n.example.com.
The first thing I do after creating this .env file is lock down its permissions. Only the user running Docker should be able to read it. This prevents other users on the system (or compromised services) from accessing the secrets. You could use Docker secrets, or even HashiCorp Vault, but for a small setup, strict file permissions and regular password rotation are already a strong baseline:
chmod 600 .env
This is the Docker Compose file where everything comes together:
services:
  postgres:
    image: postgres:15
    container_name: postgres_db
    restart: unless-stopped
    environment:
      POSTGRES_USER: ${POSTGRES_USER}
      POSTGRES_PASSWORD: ${POSTGRES_PASSWORD}
      POSTGRES_DB: ${POSTGRES_DB}
    volumes:
      - ./data/postgres:/var/lib/postgresql/data
    networks:
      - db_network

  pgadmin:
    image: dpage/pgadmin4
    container_name: pgadmin
    restart: unless-stopped
    environment:
      PGADMIN_DEFAULT_EMAIL: ${PGADMIN_EMAIL}
      PGADMIN_DEFAULT_PASSWORD: ${PGADMIN_PASSWORD}
      PGADMIN_CONFIG_SERVER_MODE: 'True'
      PGADMIN_CONFIG_MASTER_PASSWORD_REQUIRED: 'False'
    ports:
      - "8080:80"
    volumes:
      - ./data/pgadmin:/var/lib/pgadmin
    depends_on:
      - postgres
    networks:
      - db_network

  n8n:
    image: n8nio/n8n:latest
    container_name: n8n
    restart: unless-stopped
    environment:
      DB_TYPE: postgresdb
      DB_POSTGRESDB_HOST: postgres
      DB_POSTGRESDB_PORT: 5432
      DB_POSTGRESDB_DATABASE: ${POSTGRES_DB}
      DB_POSTGRESDB_USER: ${POSTGRES_USER}
      DB_POSTGRESDB_PASSWORD: ${POSTGRES_PASSWORD}
      N8N_ENCRYPTION_KEY: ${N8N_ENCRYPTION_KEY}
      N8N_SECURE_COOKIE: true
      N8N_HOST: 0.0.0.0
      N8N_PORT: 5678
      N8N_PROTOCOL: https
      N8N_EDITOR_BASE_URL: https://${PUBLIC_DOMAIN}/
      WEBHOOK_URL: https://${PUBLIC_DOMAIN}/
    depends_on:
      - postgres
    volumes:
      - ./data/n8n:/home/node/.n8n
    networks:
      - db_network

  nginx:
    image: jc21/nginx-proxy-manager:latest
    container_name: nginx_proxy
    restart: unless-stopped
    ports:
      - "80:80"
      - "443:443"
      - "81:81"
    volumes:
      - ./data/npm/data:/data
      - ./data/npm/letsencrypt:/etc/letsencrypt
    depends_on:
      - n8n
      - pgadmin
    networks:
      - db_network

networks:
  db_network:
    driver: bridge
The volume mounts deserve special attention. For PostgreSQL, I’m mounting ./data/postgres to persist the database across container restarts. For n8n, the ./data/n8n mount stores workflow data and encrypted credentials. Nginx Proxy Manager stores config and certificates in ./data/npm, and pgAdmin persists its state in ./data/pgadmin. This path structure keeps backups simple because every critical state lives under ./data.
I use restart: unless-stopped for all services rather than restart: always. The distinction matters: if I manually stop a container for maintenance, I don’t want it automatically restarting. But if the Pi reboots or Docker daemon restarts, everything should come back up without manual intervention.
After the first docker compose up -d, run a quick service sanity check:
docker compose ps
docker compose logs --tail=50 n8n
docker compose logs --tail=50 nginx
If n8n is restarting in loop, the first thing to verify is .env consistency, especially POSTGRES_*, N8N_ENCRYPTION_KEY, and PUBLIC_DOMAIN.
3. Exposing n8n Securely with Nginx Proxy Manager
Running n8n directly on port 5678 with HTTP is fine for localhost testing, but completely unacceptable for production use. You need HTTPS for security, you need proper hostname routing, and you need automatic certificate renewal. I used to configure all of this manually with raw nginx configs and certbot, but Nginx Proxy Manager (NPM) has simplified my life considerably.
NPM provides a clean web UI, usually accessible on port 81, where you can configure proxy hosts, SSL certificates, and access controls without touching nginx config files.
The SSL configuration is remarkably straightforward. In Nginx Proxy Manager, create a proxy host for <YOUR_DOMAIN>, forward to n8n:5678, enable Force SSL, and request a Let’s Encrypt certificate. NPM handles the ACME challenge automatically, as long as ports 80 and 443 are properly forwarded from your router. The certificates renew automatically every 60 days, and I’ve never had to intervene manually. This is the kind of automation that makes self-hosting sustainable.
What I particularly appreciate about this architecture is that all TLS termination happens at the proxy layer. n8n itself runs plain HTTP internally, which simplifies its configuration and reduces the attack surface. Only NPM needs access to private keys, and only NPM faces the public internet directly. This separation of concerns makes security auditing much easier.
4. Domain config with Dynamic DNS (DDNS) and Router Setup
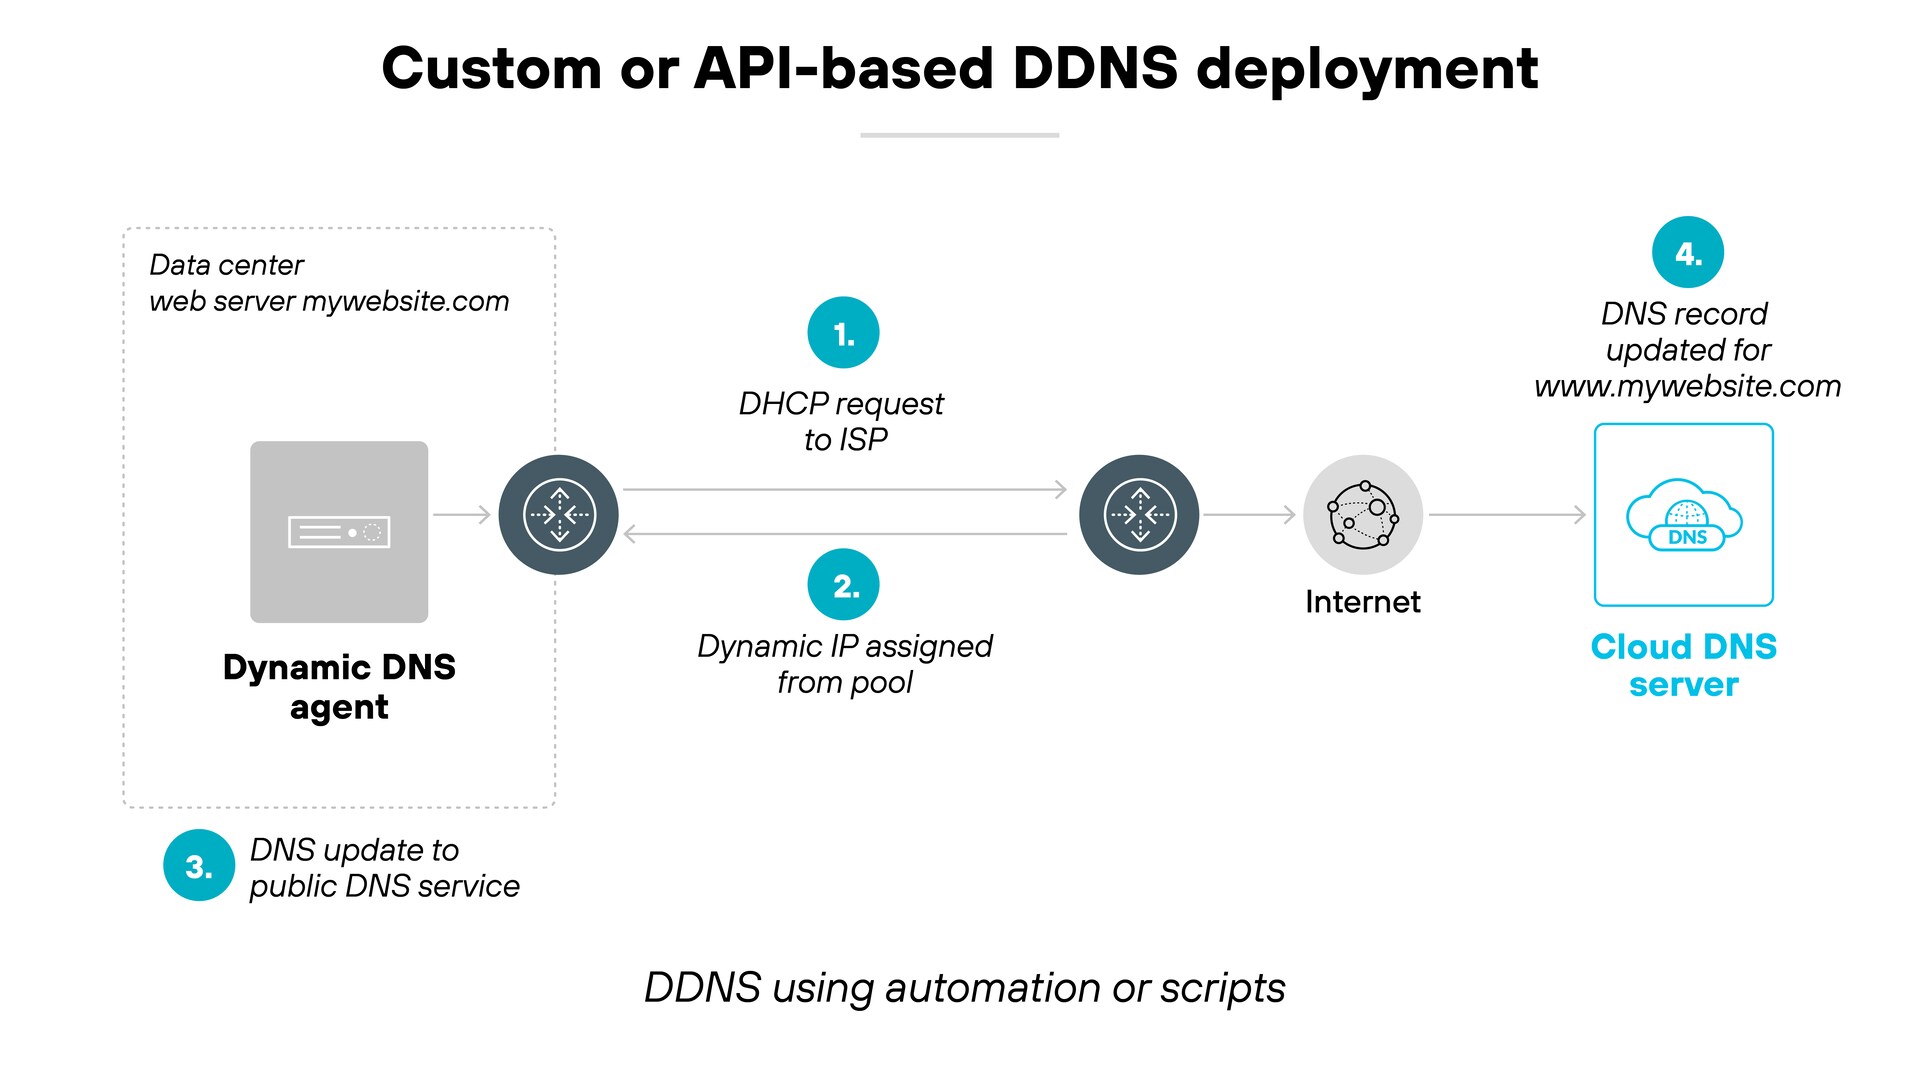
Domain and DDNS flow:
- Register domain at your registrar.
- Delegate nameservers to Cloudflare.
-
Create DNS record for your n8n host if needed.
In my case I created an
Arecord for a subdomain I reserved for my n8n instance, and that record is the one my DDNS process updates automatically. - Keep DNS updated with
ddns-updater.
Install DDNS updater:
go install github.com/qdm12/ddns-updater/cmd/ddns-updater@latest
mkdir -p ~/ddns/data
mv ~/go/bin/ddns-updater ~/ddns/
This is the configuration file config.json you need to create under ~/ddns/data directory, following the tool documentation:
{
  "settings": [
    {
      "provider": "cloudflare",
      "domain": "<YOUR_DOMAIN>",
      "token": "<CLOUDFLARE_API_TOKEN>",
      "zone_identifier": "<CLOUDFLARE_ZONE_ID>"
    }
  ]
}
To keep the updater alive 24/7, I created a systemd service:
# /etc/systemd/system/ddns-updater.service
[Unit]
Description=DDNS Updater
After=network-online.target
Wants=network-online.target

[Service]
User=<your_user>
WorkingDirectory=/home/<your_user>/ddns
ExecStart=/home/<your_user>/ddns/ddns-updater -datadir ./data
Restart=always
RestartSec=10

[Install]
WantedBy=multi-user.target
Enable and verify:
sudo systemctl daemon-reload
sudo systemctl enable --now ddns-updater.service
systemctl status ddns-updater.service
journalctl -u ddns-updater.service -f
Your router needs two settings, a fixed local IP for the Raspberry Pi, and port forwarding for 80 and 443 to that same IP.
First, get the network interface MAC address from the Raspberry Pi:
ifconfig -a
Then, in your router DHCP section, bind that MAC to a fixed LAN IP you choose. It can be any valid free IP in your subnet, for example 192.168.1.100.
Finally, create port forwarding rules pointing to that same fixed IP:
- TCP
80-><fixed_lan_ip>:80 - TCP
443-><fixed_lan_ip>:443
If the forwarded IP and the DHCP reservation IP do not match, HTTPS issuance and public access will fail.
Once DNS and forwarding are configured, validate the public path:
dig +short <YOUR_DOMAIN> @1.1.1.1
curl -I https://<YOUR_DOMAIN>
Expected result, dig returns your public IP (or Cloudflare edge IPs if proxied), and curl returns an HTTP response over TLS.
5. Automated Backups with rclone
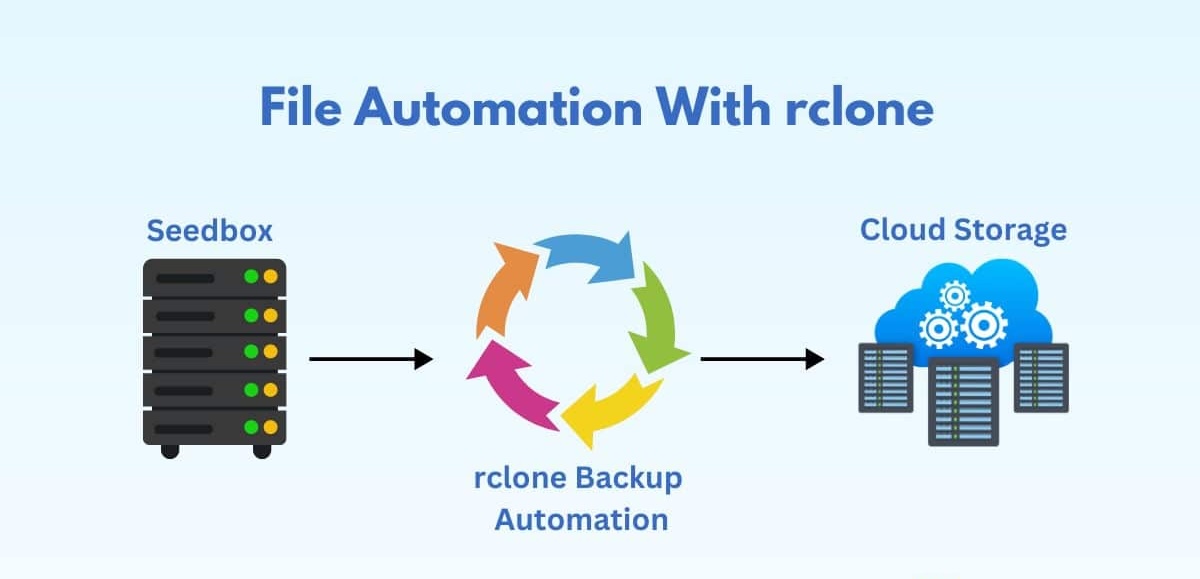
Backups include both PostgreSQL data and n8n runtime data (data/n8n). rclone is reliable for unattended uploads, supports retries, and keeps the process lightweight on Raspberry Pi.
My backup script runs nightly via cron. It loads .env, dumps the database from the running PostgreSQL container, archives n8n data, uploads both files to a timestamped Google Drive folder, and enforces local and remote retention policies.
#!/usr/bin/env bash
set -euo pipefail

PROJECT_DIR="$(pwd)"
ENV_FILE="$PROJECT_DIR/.env"
BACKUP_DIR="$HOME/.n8n/backups"
RCLONE_REMOTE="gdrive:n8n-backups"
LOCAL_RETENTION_DAYS=14
REMOTE_RETENTION_DAYS=90
TS=$(date +"%Y-%m-%d_%H-%M-%S")

set -a
source "$ENV_FILE"
set +a

PG_DUMP_FILE="$BACKUP_DIR/postgres_${TS}.sql"
N8N_TAR_FILE="$BACKUP_DIR/n8n_data_${TS}.tar.gz"
mkdir -p "$BACKUP_DIR"

docker compose exec -T postgres \
  pg_dump -U "$POSTGRES_USER" "$POSTGRES_DB" \
  > "$PG_DUMP_FILE"

tar -czf "$N8N_TAR_FILE" -C "$PROJECT_DIR" data/n8n

REMOTE_DIR="$RCLONE_REMOTE/$TS"
rclone mkdir "$REMOTE_DIR"
rclone copy "$PG_DUMP_FILE" "$REMOTE_DIR"
rclone copy "$N8N_TAR_FILE" "$REMOTE_DIR"

find "$BACKUP_DIR" -type f -mtime +"$LOCAL_RETENTION_DAYS" -delete
rclone delete "$RCLONE_REMOTE" --min-age "${REMOTE_RETENTION_DAYS}d" --rmdirs

echo "Backup OK: $TS"
Reliability depends on automation that does not require manual intervention. I use cron for backups, and a long running systemd service for DDNS.
This backup script runs via cron at 3 AM daily. The cron entry pipes output to a log file, so I have a record of every backup attempt.
0 3 * * * cd /home/pi/n8n-server && /bin/bash ./n8n-backup.sh >> /var/log/n8n-backup.log 2>&1
Operational check, verify new backup folders are being created in Google Drive and validate local log history:
rclone lsd gdrive:n8n-backups | tail -n 5
tail -n 50 /var/log/n8n-backup.log
For a quick restore drill, create a temporary database and import one dump:
set -a && source .env && set +a
docker compose exec -T postgres psql -U "$POSTGRES_USER" -c 'CREATE DATABASE n8n_restore_test;'
docker compose exec -T postgres psql -U "$POSTGRES_USER" n8n_restore_test < "$HOME/.n8n/backups/postgres_YYYY-MM-DD_HH-MM-SS.sql"
If this works and n8n data archive can be extracted without errors, your backup pipeline is operational, not just successful on paper.
6. Security and Operations Baseline
Minimal baseline for a n8n service facing public exposure:
- Restrict inbound ports with UFW firewall, allowing only 80, 443, and local SSH.
sudo ufw allow 80,443/tcp
sudo ufw allow from 192.168.1.0/24 proto tcp to any port 22
sudo ufw enable
- Enforce HTTPS end to end at the public boundary.
Nginx Proxy Manager should have Force SSL enabled for the n8n host, and n8n must keep secure URL settings:
N8N_PROTOCOL=https
N8N_SECURE_COOKIE=true
N8N_EDITOR_BASE_URL=https://${PUBLIC_DOMAIN}/
WEBHOOK_URL=https://${PUBLIC_DOMAIN}/
This avoids mixed HTTP/HTTPS behavior and ensures cookies and webhook callbacks stay in secure mode.
- Rotate credentials and minimize secret exposure.
Rotate n8n basic auth credentials, PostgreSQL credentials, and Cloudflare API token on a fixed schedule. Use a Cloudflare token scoped only to the required zone and DNS permissions, never your global API key. Keep .env and DDNS config files outside any version control system.
Most critical detail for n8n recovery, keep N8N_ENCRYPTION_KEY backed up in a secure location. Without that key, stored n8n credentials cannot be decrypted after restore.
- Harden SSH access.
Disable password authentication and root login, use SSH keys only, and keep SSH reachable only from your private network range:
sudo sed -i 's/^#\\?PasswordAuthentication.*/PasswordAuthentication no/' /etc/ssh/sshd_config
sudo sed -i 's/^#\\?PermitRootLogin.*/PermitRootLogin no/' /etc/ssh/sshd_config
sudo systemctl restart ssh
- Validate backup restorations, not only backup creation.
A successful backup command does not guarantee a valid restore. Test restores periodically in an isolated environment and verify:
- PostgreSQL dump can be restored without errors.
data/n8narchive is complete.- n8n boots correctly with the original
N8N_ENCRYPTION_KEY. - Critical workflows and credentials load correctly.
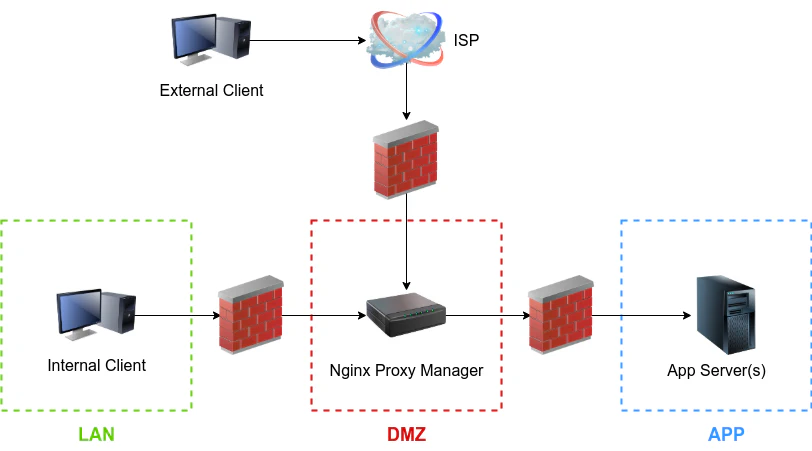
- Keep management surfaces private.
Do not expose admin ports publicly. In practice, only forward 80 and 443 in your router. Keep 81 (NPM admin), 8080 (pgAdmin), and 5678 (direct n8n) private to LAN or behind VPN.
A simple verification is checking exposed listeners from the host:
sudo ss -tulpen | grep -E '(:80|:81|:443|:5678|:8080)\\b'
Public exposure should be limited to 80/443 through your router rules.
If everything is configured correctly, opening https://<YOUR_DOMAIN> should display the n8n login page. This is the expected result after completing the setup and routing public traffic from your domain to the Raspberry Pi server.
7. Conclusions and Lessons Learned
This setup covers the full path from local deployment to stable public exposure, Docker based service isolation, HTTPS termination, DDNS automation, router alignment with DHCP reservation, and backup automation with restore oriented validation.
The most important lessons were operational, not tooling specific:
- Reliability comes from consistent automation, cron, systemd, and health checks.
- Security comes from reducing exposed surface, strict secret handling, and access hardening.
- Backups are useful only when restore is tested and repeatable.
- Portability improves when domain, credentials, and runtime paths are centralized in environment variables.
- The same architecture can be reproduced on Raspberry Pi, or cloud VMs with minimal changes.
If you follow these controls from day one, you get a setup that is easier to operate, easier to recover, and safer to expose publicly.

Comments